A security checklist of 7 things to improve the security of your Next.js applications. Dependencies, data validation & sanitization, environment variables, code exposure, security headers, centralizing functions, getting help from your editor.
Next.js benefits from the security protections that come with React. These are mainly related to preventing cross site scripting (XSS) because React automatically escapes string values to prevent malicious HTML from being injected. This is a good start, but is just one class of attack - production applications need more - and there are ways around it.
At Arcjet we're building a security SDK for developers and use Next.js for our dashboard app. Whilst we feel fairly safe against XSS vulnerabilities, we have implemented additional security protections on top of what Next.js provides out of the box.
This is a writeup of the approaches we've used to improve the security of Next.js. Good security comes from having a multi-layered approach - nothing is 100% secure, but there are a few easy things everyone can do to mitigate risk.
1. Dependencies
This may seem simple, but quickly applying patches is one of the most important ways to keep your application secure. Use a tool like Dependabot to get notified about new versions of your dependencies and open pull requests to update them.
Keeping your dependencies up-to-date makes it easier to react swiftly when critical security patches are released. Falling behind can create a significant technical debt that could be exploited. Otherwise, you may find yourself needing to work through multiple releases to get to the latest version in a stressful situation where a security vulnerability has been discovered.
Lock down your dependencies to specific versions by committing package-lock.json or a similar mechanism to your repo. This ensures everyone gets the same version, avoiding subtle differences that often arise between versions. It also prevents new versions automatically being downloaded unexpectedly, which could open you to package hijacking attacks.
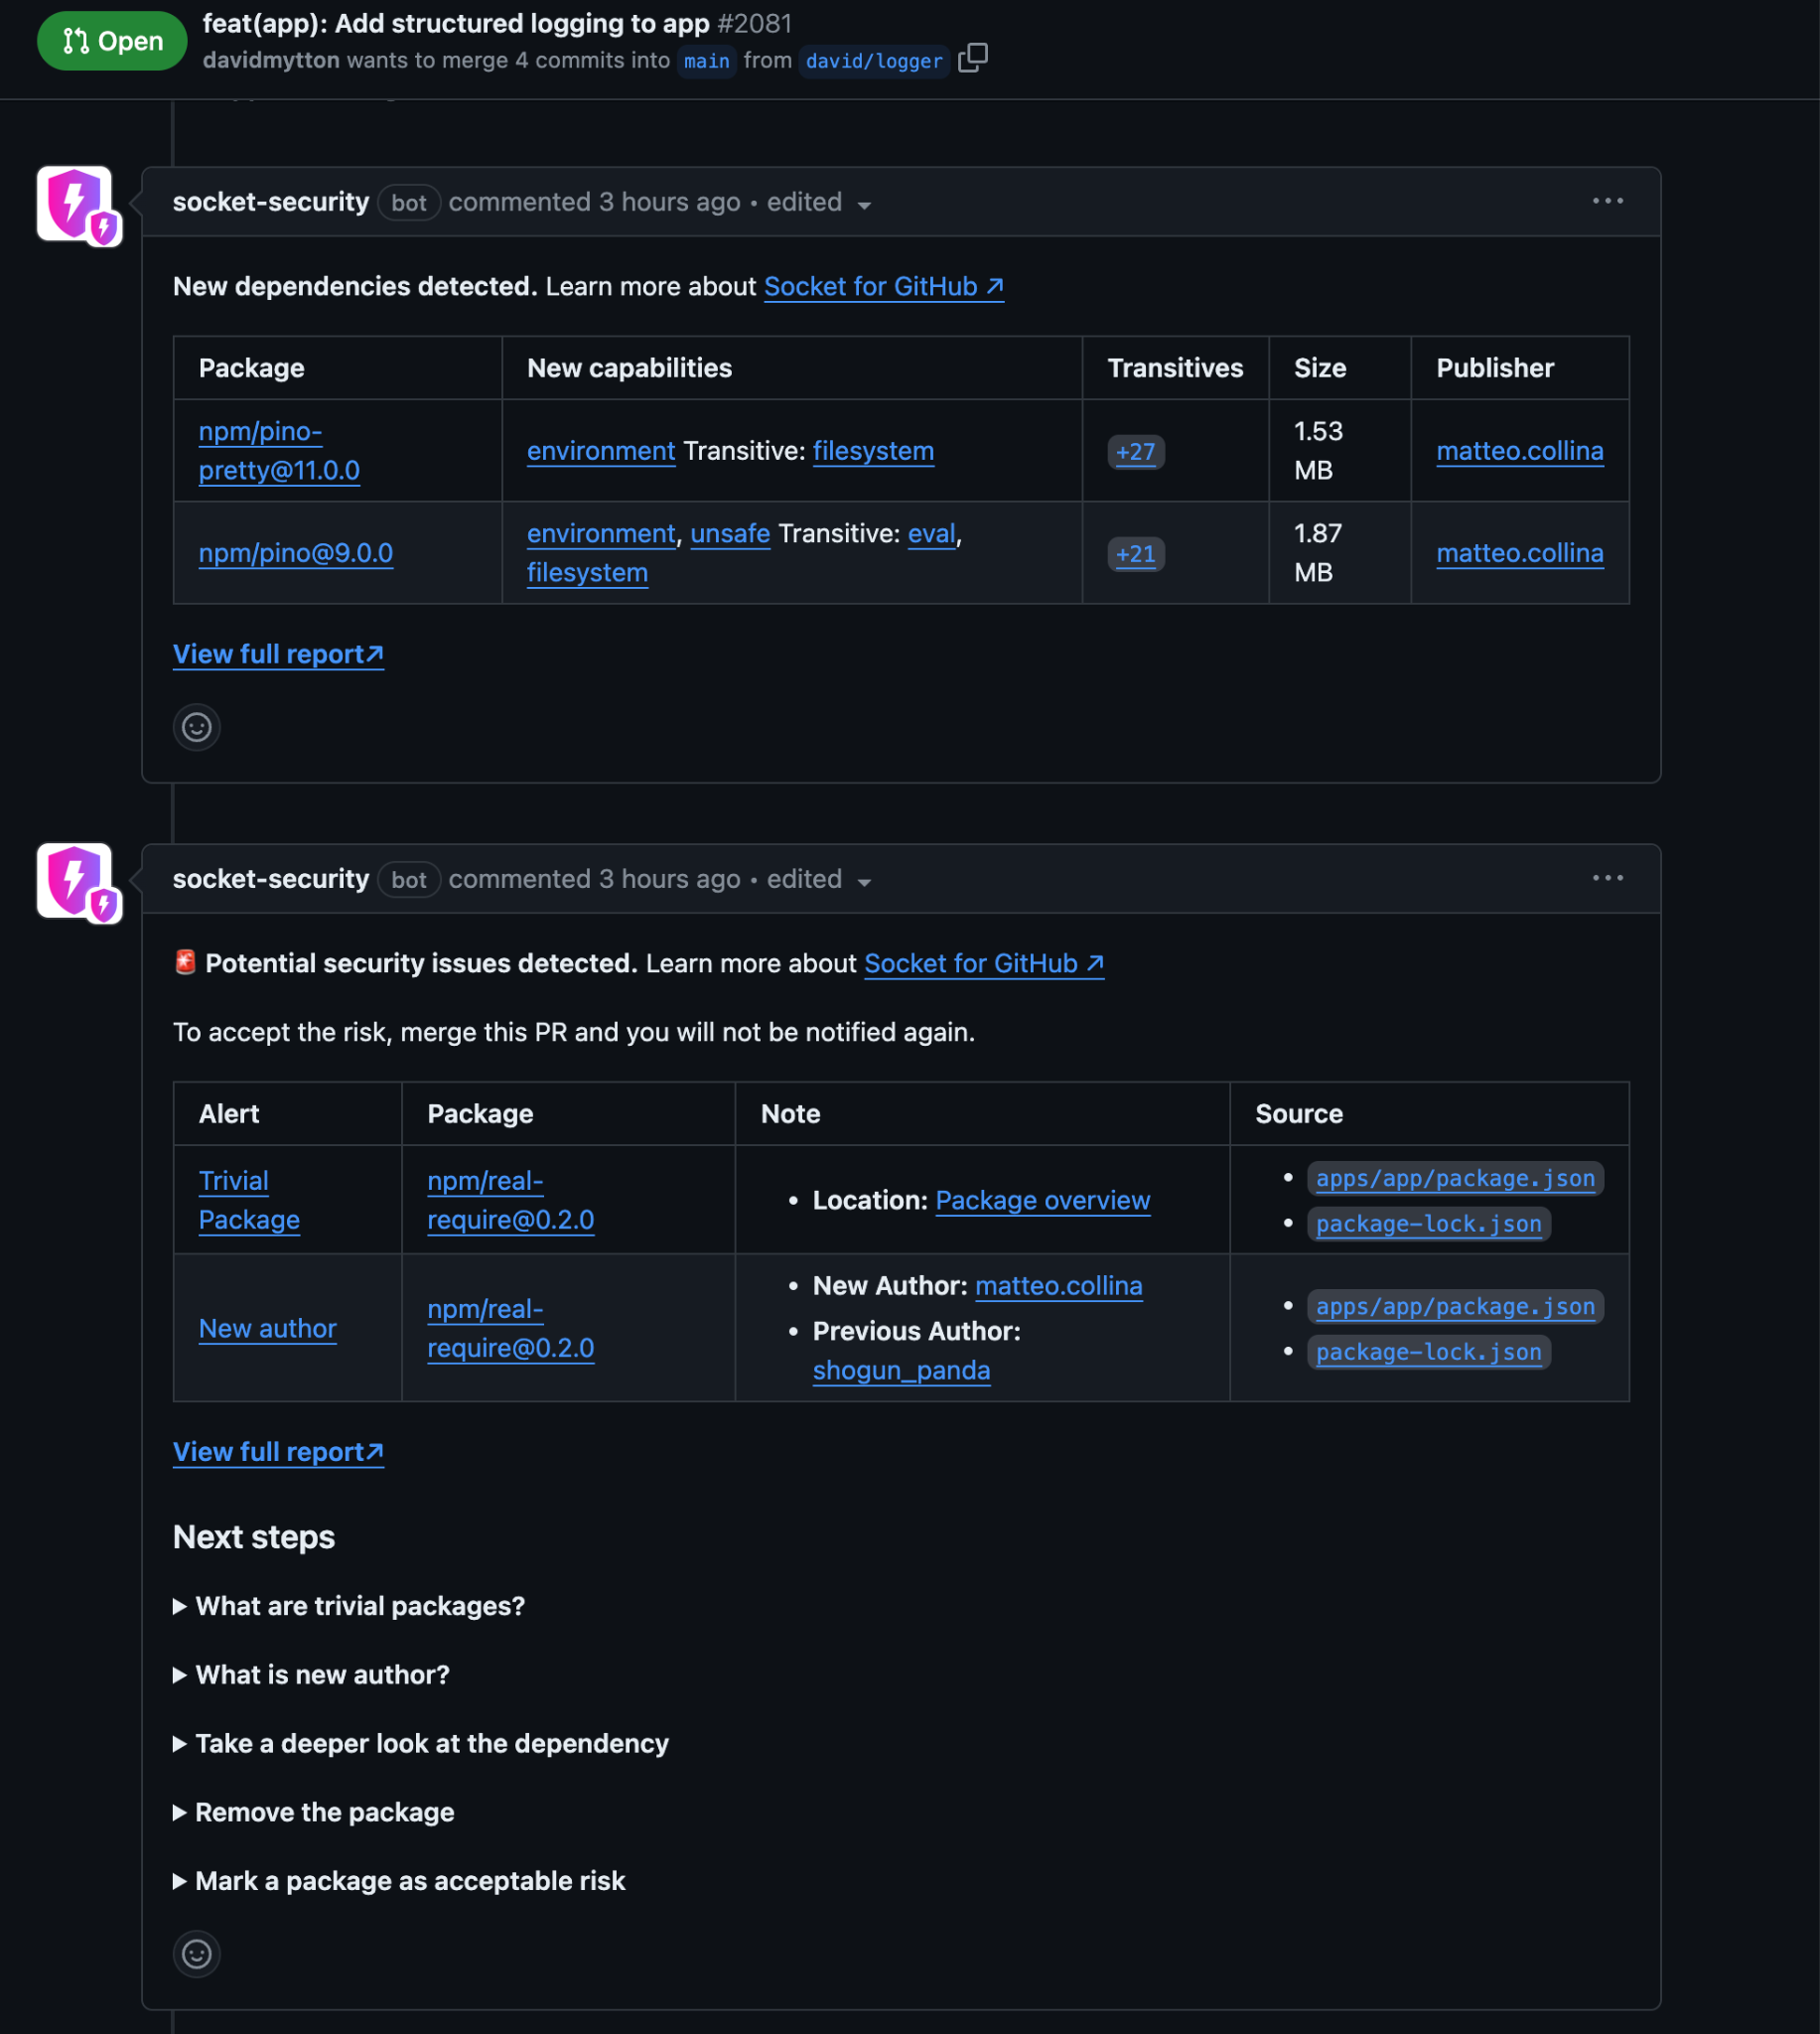
Running Socket can help assess the security of new dependencies and identify potential risks when new updates are released. Look for known vulnerabilities, suspicious new capabilities, trivial packages, and unexpected changes in author ownership. Running npm audit is an alternative and you can list all your dependencies and sub-dependencies with npm ls.
Screenshot of a Socket report about dependency updates in a pull request.
2. Data validation and sanitization
While Next.js inherits React's built-in security mechanisms, you cannot rely on them alone. Never trust data blindly – always validate input from users and external APIs.
React's escaping and sanitization help prevent XSS attacks, but they don't cover all validation needs. You still need to ensure data conforms to your application's expectations.
TypeScript's type checking is a valuable first step, but it doesn't guarantee data validity. A string might be the correct type, but it could still contain malicious content or be out of range for your application.
Use a package like zod or Valibot (or others) to validate data from users and APIs. These libraries offer schema-based validation, ensuring that incoming data matches your defined structure, types, and constraints. Don't be afraid to be strict and reject invalid input if you also provide user-friendly error messages that clearly explain what's wrong and how to fix it.
Integrate validation directly into your ORM (e.g., drizzle-zod) or API framework (e.g., tRPC) for a smooth developer experience and consistent data integrity throughout your stack.
// Drizzle schema for the teams table
const teamIdPrefix = "team";
export const teams = pgTable("teams", {
  id: text("id")
    .notNull()
    .primaryKey()
    .$defaultFn(() => typeid(teamIdPrefix).toString()),
  name: text("name").notNull(),
  isDefault: boolean("is_default").default(false),
  createdAt: timestamp("created_at", { mode: "date" }).notNull().defaultNow(),
  updatedAt: timestamp("updated_at", { mode: "date" }).notNull().defaultNow(),
  deletedAt: timestamp("deleted_at", { mode: "date" }),
});
export type Team = typeof teams.$inferSelect; // return type when queried
export type NewTeam = typeof teams.$inferInsert; // insert type

// Zod schema lives alongside the database schema
export const insertTeamSchema = createInsertSchema(teams, {
  name: (schema) =>
    schema.name
      .min(2, { message: "Must be 2 or more characters." })
      .max(100, { message: "Must be 100 or fewer characters." })
      .trim(),
});

export const selectTeamSchemaId = createSelectSchema(teams, {
  id: (schema) =>
    schema.id.trim().startsWith(teamIdPrefix).min(typeIdMin).max(typeIdMax),
  name: (schema) => schema.name.optional(),
  isDefault: (schema) => schema.isDefault.optional(),
  createdAt: (schema) => schema.createdAt.optional(),
  updatedAt: (schema) => schema.updatedAt.optional(),
  deletedAt: (schema) => schema.deletedAt.optional(),
});
Example Drizzle + Zod schemas living alongside each other.
What to watch out for
These features have their uses, but should warrant extra caution and review:
Any use of dangerouslySetInnerHTML in your application is a risk. This feature is explicitly named "dangerous" for a reason. It allows you to inject raw HTML directly into the DOM, bypassing React's security mechanisms. This opens the door to Cross-Site Scripting (XSS) attacks, where malicious scripts can be executed in the user's browser. Instead, construct your HTML dynamically within your components using props, state, or other safe mechanisms. This allows React to sanitize the output and protect against XSS vulnerabilities.
Using innerHTML to set content can expose your application to XSS attacks if not handled carefully. Prefer innerText when setting plain text content. Unlike innerHTML, innerText does not parse HTML tags, preventing the execution of injected scripts.
While it's generally best to avoid these features, there may be rare cases where they are necessary, such as when integrating with third-party libraries.
3. Environment variables
Next.js automatically loads environment variables and wisely defaults to restricting environment variables to server-side code. This means they are not directly exposed to the client-side, helping to prevent accidental data leaks.
If you must make a variable accessible on the client-side, prefix it with NEXT_PUBLIC_. However, exercise caution – any value you expose this way becomes visible to anyone who inspects your website's code.
Avoid storing API keys, database credentials, or other sensitive secrets directly in environment variables. This is a security risk as environment variables can be easily exposed in various ways (e.g., through logs, crashes, or misconfigurations). Use a dedicated secrets manager like HCP Vault Secrets, AWS Secrets Manager, 1Password, Infisical or Doppler to securely store and manage sensitive credentials. These tools offer robust encryption, access controls, and auditing capabilities.
One way to guard against this is to use server-only (NPM) when you want to guarantee they will never be used on the client. If a client component tries to use a server-only module, the build will fail.
Install the package and then add this to the top of your files that should only ever execute on the server:
import "server-only";
5. Security headers
Security headers are powerful tools that instruct browsers on how to handle your website's content. Think of them as guardrails that help prevent common web attacks.
Here are the essential headers to prioritize for your Next.js application:
Content Security Policy (CSP): This crucial header helps prevent Cross-Site Scripting (XSS), code injection, and data theft by specifying which sources (scripts, styles, images, etc.) are allowed to load on your site. Start with a strict policy (e.g., default-src 'self') and gradually relax it as needed. Once you have a CSP policy, you can evaluate it with the CSP Evaluator tool from Google.
Strict-Transport-Security (HSTS): Forces browsers to interact with your site exclusively over HTTPS, ensuring secure communication and preventing downgrade attacks.
X-Content-Type-Options: Blocks browsers from "sniffing" content types, preventing them from misinterpreting files (e.g., treating an image as an executable script).
Permissions-Policy: This header allows you to control which browser features and APIs are available to scripts running on your site, reducing the attack surface.
Referrer-Policy: Manages how much referrer information is sent when users click links on your site. This protects user privacy.
Using next-safe to set the CSP security headers in Next.js
Other headers
X-Frames-Options: This header prevents your site from being embedded in frames on other sites, mitigating clickjacking attacks. It is now part of the Content Security Policy specification, so you can set the frame-ancestors directive in your CSP to achieve the same effect. This header is useful for older browsers that don’t support CSP.
X-XSS-Protection: This header was a feature of Internet Explorer, Chrome, and Safari that enabled the browser’s built-in XSS filter. It is deprecated and should not be used.
6. Centralize security functions
A well-organized security strategy involves centralizing key functions. This approach streamlines testing, auditing, and maintenance while reducing the risk of inconsistencies or oversights.
Why Centralization Matters
Improved Maintainability: Changes to security logic can be made in one place, reducing the risk of errors.
Enhanced Testability: Centralized functions are easier to test comprehensively.
Streamlined Auditing: Auditors can focus on a single location to assess your security controls.
Reduced Attack Surface: Consolidating security logic minimizes the chances of inconsistencies or vulnerabilities being introduced due to scattered code.
Authentication (AuthN)
Centralized AuthN simplifies user management, reduces boilerplate code, and strengthens your defenses against unauthorized access.
Handle authentication through middleware. This ensures that user sessions are validated automatically on every request, without requiring manual checks in individual components.
Centralized AuthZ prevents accidental privilege escalation, ensures consistent enforcement of permissions, and streamlines access control management.
Implement a dedicated authorization mechanism to determine which users can access specific resources or perform particular actions.
Explore authorization frameworks like Oso, which enables you to define complex access control policies declaratively. For simpler scenarios, a custom function might suffice.
Beyond AuthN and AuthZ
Centralization isn't limited to authentication and authorization. Consider consolidating other security-related functions:
Input Validation: As discussed above, create reusable validation functions or schemas to ensure data integrity across your application.
Error Handling: Develop a standardized error handling mechanism that logs security-relevant events and provides appropriate responses to users.
Security Monitoring: Centralize security logs and alerts to detect and respond to potential threats promptly.
Attack Detection: We use Arcjet Shield to analyze all requests and detect / block suspicious activity. This is like a WAF for Next.js, but installed as an SDK so you can test it locally, define rules in code, and use the request context to understand how to respond e.g. stricter rules for anonymous users.
7. Code editor
Your code editor is more than just a place to write code – with the right setup, it can also help you catch security issues before you commit.
Linting and Static Analysis: Enable linting tools like ESLint (for JavaScript/TypeScript) and style linters (e.g., Prettier) to catch syntax errors, style inconsistencies, and potential security issues early on. Configure your editor to display linter warnings and errors directly in your code.
Trunk for Effortless Setup: We use Trunk to automatically manage linter configurations and streamline the setup process. The configuration is managed by Trunk and it ensures everyone on the team is using the same setup. These include the following security-focused linters and tools:
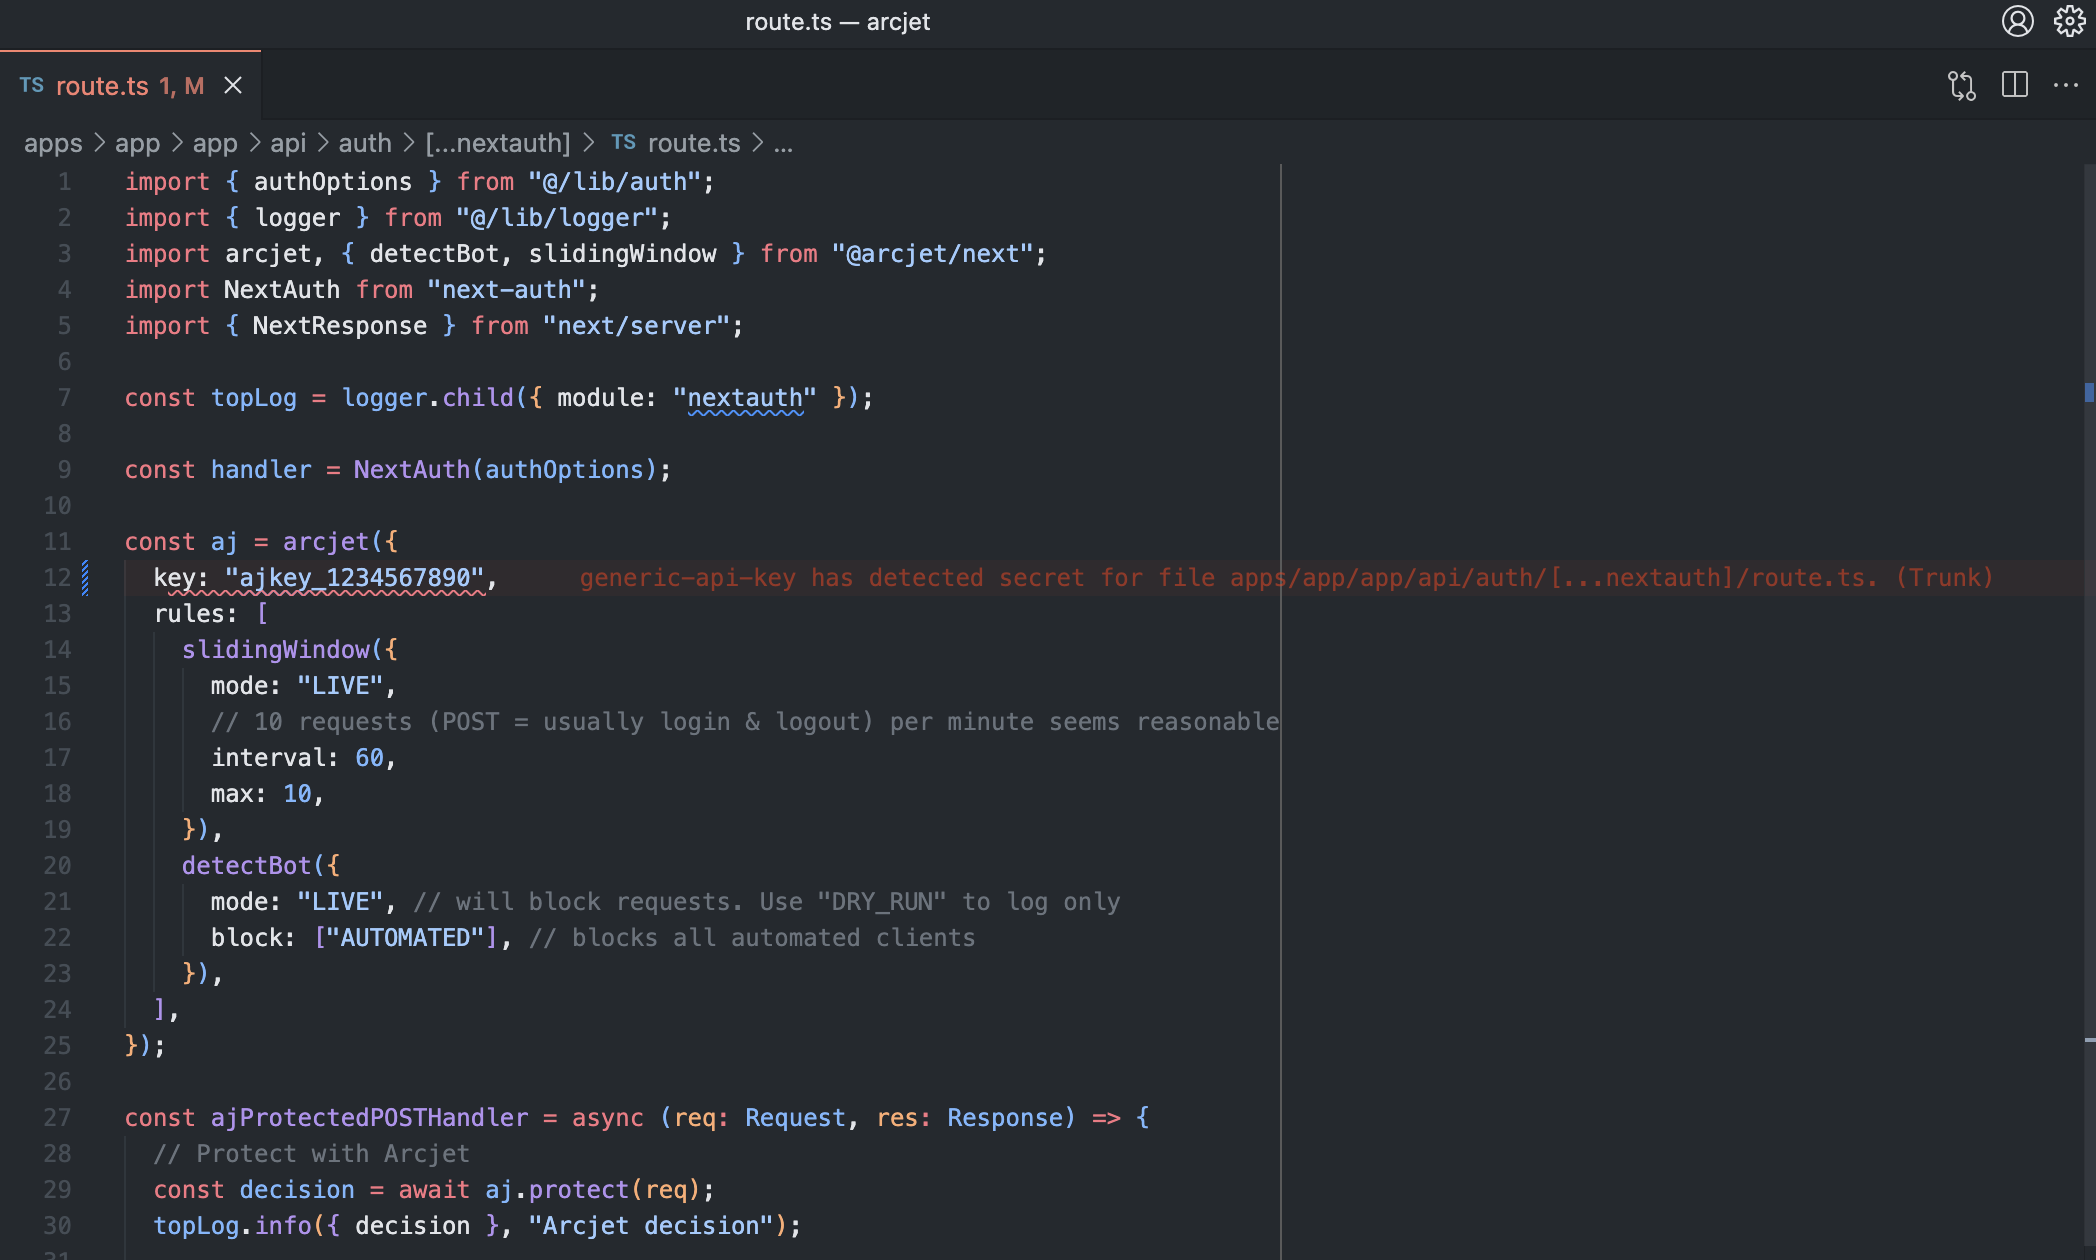
Trivy: Scans containers, filesystem, Git, VMs, and other config as code systems for known vulnerabilities, secrets, licensing problems and misconfigurations.
TruffleHog: Detects secrets (API keys, passwords, etc.) that may have accidentally been included in your code or build artifacts.
Gitleaks: Searches your git history for exposed secrets or sensitive information.
Semgrep: A powerful static analysis tool that can be customized to find specific security patterns or anti-patterns in your code.
Integrate with CI/CD: Ensure these security checks are integrated into your Continuous Integration/Continuous Deployment (CI/CD) pipeline. This helps prevent vulnerable code from reaching production.
These can all be used independently, but also have editor plugins to highlight problems as you code. Catching security issues early in the development process is far less costly than fixing them after deployment!
Using Trunk in VS Code to detect secrets.
Other Resources
Other resources to help you secure your Next.js application:
Self-host apps securely with Coolify and Tailscale. This guide provides instructions for setup, deployment on a private Tailscale network, and public access for Next.js on Coolify.
How do you test Next.js app router API route handlers? A guide to testing Next.js API routes and mocking next-auth to properly test authenticated routes.