Form spam is annoying. Clogging your inbox with messages is one thing, but when fraudulent users are signing up and abusing your service that’s when it also starts to cost money. Whether it’s taking advantage of a free compute quota, consuming your AI credits, or running stolen credit cards through your payment processor, protecting forms can suddenly become really important.
Protecting a form usually involves a few steps - setting up form validation, applying a sensible rate limit, implementing bot detection, and properly validating email addresses. This post will guide you through implementing each of these for the React Hook Form framework.
We’ll use Next.js + the shadcn/ui component library as an example because it’s really easy to get started. The form component has features like accessibility and keyboard shortcuts, however these steps apply to any other framework as well.
A React Hook Form with email validation.
Form Validation with Zod
Validating each submitted field means attackers need to spend more time creating realistic values. Nothing will provide 100% protection, but every layer of protection we implement is all about making it a bit more annoying for spammers to abuse your form. Adding form validation is straightforward and has UX benefits as well as making it a little more difficult to spam - that’s why adding it is the first step.
In this example we’ll use Zod which is a popular TypeScript validation library that integrates directly with React Hook Form. You define a schema for the form and then Zod validates the submission, returning structured errors so they can be displayed nicely for each field.
For our example form we will have a single email field. This might be used to sign up for a newsletter or could be part of a larger form. You can easily add more fields, but this keeps it simple in our examples.
import { z } from "zod";
// Zod schema for client-side validation of the form fields. Arcjet will do
// server-side validation as well because you can't trust the client.
// Client-side validation improves the UX by providing immediate feedback
// whereas server-side validation is necessary for security.
export const formSchema = z.object({
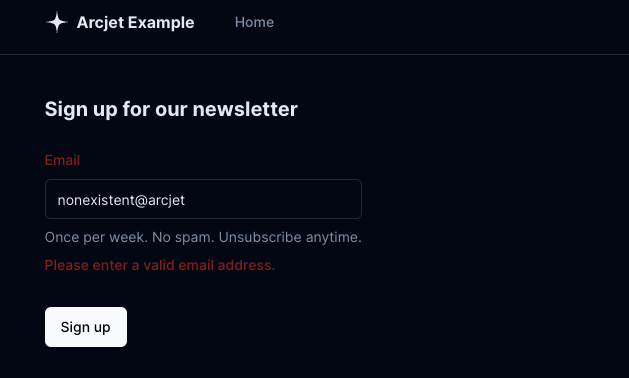
email: z.string().email({
message: "Please enter a valid email address.",
}),
});
Zod form validation schema.
Zod has email as a built-in string type validation which means you don’t need to think about the complexities of how valid emails should look. The message is a custom error message if the validation fails.
We can set up the form with the Zod schema and resolver:
import { zodResolver } from "@hookform/resolvers/zod";
import { useForm } from "react-hook-form";

const form = useForm<z.infer<typeof formSchema>>({
  resolver: zodResolver(formSchema),
  defaultValues: {
    email: "example@arcjet.com",
  },
});
Creating the React Hook Form with the Zod schema.
This connects to the single field we have in our form named email which matches the field name in the Zod schema.
React Hook Form includes error handling so you can show errors specific to each field. We only have a single field, but in long forms this helps improve the UX by highlighting fields the user needs to fix. In our example, we are using Next.js + the shadcn/ui component library. This includes a <FormMessage /> component that handles displaying an error message.
Validating the email syntax.
This is the component that returns our validated form. The <Input> component sets the field type to email which also enables browser-side validation. This doesn’t stop attackers because it’s easy to bypass, but it helps improve the UX for real users.
return (
  <Form {...form}>
    <form onSubmit={form.handleSubmit(onSubmit)} className="space-y-8">
      <FormField
        control={form.control}
        name="email" // The name of the field in the form schema.
        render={({ field }) => (
          <FormItem>
            <FormLabel>Email</FormLabel>
            <FormControl>
              <Input
                type="email"
                placeholder="totoro@example.com"
                {...field}
              />
            </FormControl>
            <FormDescription>
              Once per week. No spam. Unsubscribe anytime.
            </FormDescription>
            <FormMessage />
          </FormItem>
        )}
      />
      <Button type="submit">Sign up</Button>
    </form>
  </Form>
);
The TSX form component.
When the form is submitted we want to create a POST request to an API route. We should handle any errors from that request so the complete form component would look like this:
"use client";

import { Button } from "@/components/ui/button";
import {
  Form,
  FormControl,
  FormDescription,
  FormField,
  FormItem,
  FormLabel,
  FormMessage,
} from "@/components/ui/form";
import { Input } from "@/components/ui/input";
import { formSchema } from "@/lib/formSchema";
import { zodResolver } from "@hookform/resolvers/zod";
import { useRouter } from "next/navigation";
import { useForm } from "react-hook-form";
import { z } from "zod";

export function EmailForm() {
  // Allows us to set an error message on the form.
  const {
    setError,
    formState: { errors },
  } = useForm();
  // Used to navigate to the welcome page after a successful form submission.
  const router = useRouter();

  // Set up the form with the Zod schema and a resolver.
  const form = useForm<z.infer<typeof formSchema>>({
    resolver: zodResolver(formSchema),
    defaultValues: {
      email: "example@arcjet.com",
    },
  });

  // Define a submit handler called when the form is submitted. It sends the
  // form data to an API endpoint and redirects to the welcome page on success.
  async function onSubmit(values: z.infer<typeof formSchema>) {
    // values is guaranteed to be of the correct type by the Zod schema.
    const result = await fetch("/api/submit", {
      body: JSON.stringify(values),
      method: "POST",
      headers: {
        "Content-Type": "application/json",
      },
    });

    // Check if the request was successful and redirect to the welcome page if
    // so. Otherwise, set a root error message.
    if (result.ok) {
      router.push("/welcome");
    } else {
      const statusText = result?.statusText || "Service error";
      const error = await result.json();
      const errorMessage = error?.message || statusText;

      setError("root.serverError", {
        message: `We couldn't sign you up: ${errorMessage}`,
      });
    }
  }

  return (
    <Form {...form}>
      <form onSubmit={form.handleSubmit(onSubmit)} className="space-y-8">
        <FormField
          control={form.control}
          name="email" // The name of the field in the form schema.
          render={({ field }) => (
            <FormItem>
              <FormLabel>Email</FormLabel>
              <FormControl>
                <Input
                  type="email"
                  placeholder="totoro@example.com"
                  {...field}
                />
              </FormControl>
              <FormDescription>
                Once per week. No spam. Unsubscribe anytime.
              </FormDescription>
              <FormMessage />
              {errors.root?.serverError && (
                <FormMessage>{errors.root.serverError.message}</FormMessage>
              )}
            </FormItem>
          )}
        />
        <Button type="submit">Sign up</Button>
      </form>
    </Form>
  );
}
The completed EmailForm component /components/EmailForm.tsx
Rate limiting form submissions
Most legitimate users will submit a form once and that’s it. If there’s an error then maybe you might re-submit a couple of times before getting it right, but submitting a form more than a few times from the same IP address within a short time window indicates something nefarious is happening.
We can copy the example in the Next.js project to implement an in-memory rate limit for our form submission API endpoint. This uses the client IP address to set a maximum of 5 requests per 10 minutes, which seems like a reasonable limit for legitimate requests.
We use the @arcjet/ip package to ensure we have a valid IP address because IP headers can be easily spoofed. Where possible it extracts the IP from the headers set on common hosting platforms like Cloudflare, or Vercel before falling back on the remote address headers.
import rateLimit from "@/lib/rate-limit";
import ip from "@arcjet/ip";
import { NextRequest, NextResponse } from "next/server";

const limiter = rateLimit({
  interval: 600 * 1000, // 10 minutes (600 seconds * 1000 ms)
  uniqueTokenPerInterval: 500, // Max 500 IPs
});

export async function POST(req: NextRequest) {
  const json = await req.json();

  // Use the @arcjet/ip package to get the client's IP address. This looks at
  // the headers set by different hosting platforms to try and get the real IP
  // address before falling back to the request's remote address. This is
  // necessary because the IP headers could be spoofed. In non-production
  // environments we allow private/internal IPs.
  const clientIp = ip(req, req.headers);

  try {
    await limiter.check(5, clientIp); // Limit to 5 requests
  } catch {
    return NextResponse.json(
      { message: "Rate limit exceeded. Try again later." },
      { status: 429 }
    );
  }

  // ... do something with the email here

  return NextResponse.json({
    ok: true,
  });
}
Form submission API route /app/api/submit/route.ts
The main disadvantage of using this in-memory rate limit is that if the server is restarted then all the rate limits will be reset. The rate limit is defined outside of the handler so it can persist across requests. However, if the environment is recycled and a new “cold start” is triggered, the rate limit also starts from scratch. In serverless environments this can happen regularly (even after every request).
One way to solve this problem is with an external datastore like Redis. The popular @upstash/ratelimit package uses Redis as its backing storage, which obviously means you need to deal with running Redis somewhere. This can be a hassle if you need to distribute the nodes around the world for better response times. At Arcjet we’re building a set of security tools for developers exposed through a native SDK. Our rate limiting functionality deals with this so you don’t need to worry about persistence or manage Redis.
Rate limits with React Hook Form.
Bot detection on form submission
Attackers will automate their submission of your form because they’re probably executing attacks against lots of other forms. They might also want to try lots of fake accounts to see what works. This means you should protect your form from automated bot submissions.
Bot protection is difficult. There are lots of products available which use various techniques to detect automated clients. There are even more ways around these detections! Nothing works perfectly.
One approach is to analyze the user agent to block known bots. There are several libraries available to help with this, but the isbot package is regularly updated with new user agents so is the one I’d recommend.
This can easily be added to our route handler:
// ...
if (isbot(req.headers.get("User-Agent"))) {
  return NextResponse.json(
    { message: "Bots are not allowed." },
    { status: 403 }
  );
}
// ...
Using the isbot library.
The obvious disadvantage is that the client can easily spoof the user agent. For more robust detection, various other signals must be considered as part of the request. This can include past behavior and IP reputation details, variables that we consider as part of the Arcjet bot detection functionality. However, security is all about layers so just checking the user agent is a good first step.
Form email validation
The final step is to check whether the email address is valid. There are 10 different RFCs that define the email address format so it’s important not to be too narrow in your validation rules. Zod handles this for us (above), but we need to be sure that it is run on both the client and server because anything running only on the client can be bypassed.
If we move our schema to a separate file then we can include it in both the client and server code. In this example we’ve moved the Zod schema to /lib/form-schema.ts
import { formSchema } from "@/lib/form-schema";
import rateLimit from "@/lib/rate-limit";
import ip from "@arcjet/ip";
import { isbot } from "isbot";
import { NextRequest, NextResponse } from "next/server";

const limiter = rateLimit({
  interval: 600 * 1000, // 10 minutes (600 seconds * 1000 ms)
  uniqueTokenPerInterval: 500, // Max 500 IPs
});

export async function POST(req: NextRequest) {
  const json = await req.json();
  const data = formSchema.safeParse(json);

  if (!data.success) {
    const { error } = data;

    return NextResponse.json(
      { message: "Invalid request", error },
      { status: 400 }
    );
  }

  if (isbot(req.headers.get("User-Agent"))) {
    return NextResponse.json(
      { message: "Bots are not allowed." },
      { status: 403 }
    );
  }

  const { email } = data.data;

  // Use the @arcjet/ip package to get the client's IP address. This looks at
  // the headers set by different hosting platforms to try and get the real IP
  // address before falling back to the request's remote address. This is
  // necessary because the IP headers could be spoofed. In non-production
  // environments we allow private/internal IPs.
  const clientIp = ip(req, req.headers);

  try {
    await limiter.check(5, clientIp); // Limit to 5 requests
  } catch {
    return NextResponse.json(
      { message: "Rate limit exceeded. Try again later." },
      { status: 429 }
    );
  }

  // ... do something with the email here

  return NextResponse.json({
    ok: true,
  });
}
Form submission API route /app/api/submit/route.ts with email validation.
Form email verification
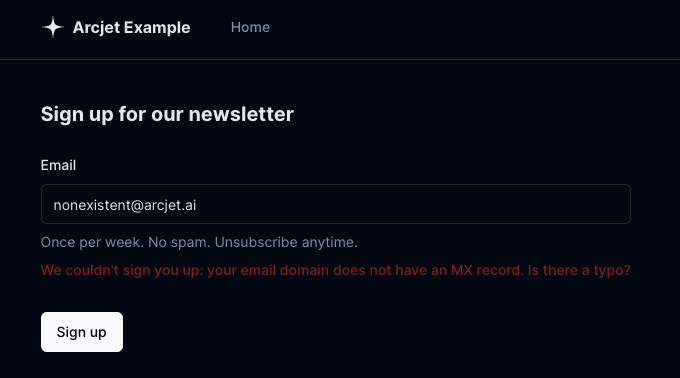
Checking the string syntax tells us whether the email is valid or not, but that doesn’t mean it can receive email or whether it's an email we want to accept. What if it’s from a disposable email service? Are there MX records set so it can actually receive messages?
These are all additional checks which feed into whether you want to automatically allow a signup, block it completely, or perhaps just flag it for human review. There aren’t any good libraries for this in TypeScript which is why we built it into the Arcjet product. You can use the Arcjet email validation just by itself, but we also package everything together into a signup form protection rule. This combines rate limiting, bot protection, email validation and email verification.
Using Arcjet, the API endpoint looks like this. You can also find the fully implemented example project on GitHub.
import { formSchema } from "@/lib/formSchema";
import arcjet, { protectSignup } from "@arcjet/next";
import { NextResponse } from "next/server";
const aj = arcjet({
// Get your site key from https://app.arcjet.com
// and set it as an environment variable rather than hard coding.
// See: https://nextjs.org/docs/app/building-your-application/configuring/environment-variables
key: process.env.ARCJET_KEY,
rules: [
protectSignup({
email: {
mode: "LIVE", // will block requests. Use "DRY_RUN" to log only
// Block emails that are disposable, invalid, or have no MX records
block: ["DISPOSABLE", "INVALID", "NO_MX_RECORDS"],
},
bots: {
mode: "LIVE",
// Block clients that we are sure are automated
block: ["AUTOMATED"],
},
// It would be unusual for a form to be submitted more than 5 times in 10
// minutes from the same IP address
rateLimit: {
// uses a sliding window rate limit
mode: "LIVE",
interval: "10m", // counts requests over a 10 minute sliding window
max: 5, // allows 5 submissions within the window
},
}),
],
});
export async function POST(req: Request) {
const json = await req.json();
const data = formSchema.safeParse(json);
if (!data.success) {
const { error } = data;
return NextResponse.json(
{ message: "Invalid request", error },
{ status: 400 }
);
}
const { email } = data.data;
const decision = await aj.protect(req, { email });
console.log("Arcjet decision: ", decision);
if (decision.isDenied()) {
if (decision.reason.isEmail()) {
let message: string;
// These are specific errors to help the user, but will also reveal the
// validation to a spammer.
if (decision.reason.emailTypes.includes("INVALID")) {
message = "email address format is invalid. Is there a typo?";
} else if (decision.reason.emailTypes.includes("DISPOSABLE")) {
message = "we do not allow disposable email addresses.";
} else if (decision.reason.emailTypes.includes("NO_MX_RECORDS")) {
message =
"your email domain does not have an MX record. Is there a typo?";
} else {
// This is a catch all, but the above should be exhaustive based on the
// configured rules.
message = "invalid email.";
}
return NextResponse.json(
{ message, reason: decision.reason },
{ status: 400 }
);
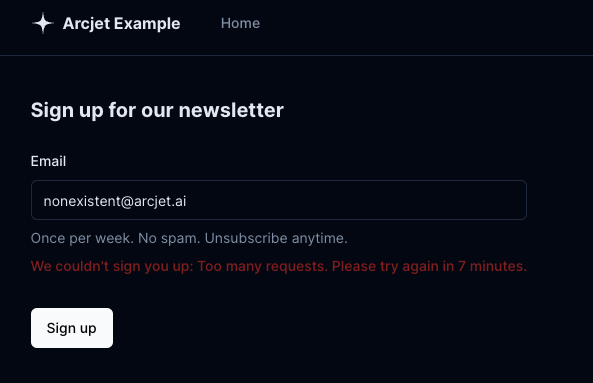
} else if (decision.reason.isRateLimit()) {
const reset = decision.reason.resetTime;
if (reset === undefined) {
return NextResponse.json(
{
message: "Too many requests. Please try again later.",
reason: decision.reason,
},
{ status: 429 }
);
}
// Calculate number of seconds between reset Date and now
const seconds = Math.floor((reset.getTime() - Date.now()) / 1000);
const minutes = Math.ceil(seconds / 60);
if (minutes > 1) {
return NextResponse.json(
{
message: `Too many requests. Please try again in ${minutes} minutes.`,
reason: decision.reason,
},
{ status: 429 }
);
} else {
return NextResponse.json(
{
message: `Too many requests. Please try again in ${reset} seconds.`,
reason: decision.reason,
},
{ status: 429 }
);
}
} else {
return NextResponse.json({ message: "Forbidden" }, { status: 403 });
}
}
return NextResponse.json({
ok: true,
});
}
Preventing spam and abuse on forms is crucial for maintaining the integrity of websites and applications. Implementing form validation, rate limiting, bot detection, and email address verification enhances the user experience while strengthening security. React Hook Form simplifies form building, especially when combined with UI component libraries such as shadcn/ui.
Although this post demonstrates how to create these protections, Arcjet offers a comprehensive solution that accelerates the process and provides ongoing protection against evolving threats.
A security checklist of 7 things to improve the security of your Next.js applications. Dependencies, data validation & sanitization, environment variables, code exposure, security headers, centralizing functions, getting help from your editor.
A tutorial for protecting your NestJS application with Arcjet. Arcjet makes it easy to build rate limiting, bot detection, email verification & attack detection into NestJS.